Featured

Meatballs and Red Gravy

Next week, high school soccer kicks off — which means between high school and junior high, we will spend every night this week shivering in a stadium somewhere watching the boys play — and I love every single minute of it. Seriously!

Teaching seniors reminds me yearly how fast these days go by. Plus, it helps that I genuinely enjoy the sport and I love all the other kids on the team, too. Supporting my students while I cheer on my own kids is definitely the sweet spot of teaching.

BUT there is one serious drawback. Soccer season absolutely wreaks havoc on my supper schedule.

Despite many attempts, I am not a very good crock-potter. However, I’ve found that if I make a big batch of something hearty, I can pull it from the freezer or fridge into the crockpot when we get home from school, and it’s ready and hot when the soccer game is over.

Enter meatballs and red gravy.

I love that this recipe is infinitely scalable… I usually triple the meatballs and put the rest in the freezer to be reheated with jarred sauce on a soccer night (Rao’s marinara is my absolute favorite for this — see the note following the recipe).

For the meatballs:

(I usually use 3 pounds of meat and multiply the following ingredients by 3, but I have done it with up to 5 pounds of meat)

Ingredients:

  • 2-3 pounds hamburger meat, and then, for each pound of hamburger meat:
  • 1 egg (so for 3 lbs meat, I use 3 eggs, etc., for all remaining ingredients)
  • 1/4 onion, chopped very fine (or substitute 1/2 teaspoon onion powder)
  • 2 pieces of white bread, wet and wrung out
  • 1/4 cup Italian bread crumbs
  • 1/2 teaspoon garlic powder
  • 1/2 teaspoon oregano
  • 1/4 cup Parmesan cheese
  • Salt and pepper to taste

Preparation:

  • In a large mixing bowl, combine all of the ingredients until you cannot see the bread.
  • Optional: (but I do it every time) make a small, flat disk of the seasoned mixture (about the size of a quarter). Brown it in a nonstick skillet and taste for seasonings… or let your pickiest kid taste 😉 this keeps me from under or over seasoning, and I do it with big batches of hamburgers, too.
  • Adjust seasoning as necessary. Using a cookie scooper, form into meatballs, about 1 and 1/2 inches in diameter
  • Freeze the meatballs you will use later on a cookie sheet lined with wax or parchment paper.
  • For the meatballs you plan to eat tonight, cook them in one of two ways: either brown them in a skillet in some olive oil (5-7 minutes, a little splattery, but better flavor), or bake them in the oven at 375 for about 20 minutes, until brown.
  • Gently place browned meatballs in the sauce and cook at a gentle simmer for about an hour.

For the sauce:

Ingredients:

  • Olive oil
  • 1 onion, minced
  • 2-3 cloves garlic, minced
  • 6 ounces tomato paste
  • 28 ounces (2 cans) tomato sauce
  • 14 ounces (1 can) water
  • 6 ounces (about 1/2 can) wine
  • 1 scant teaspoon sugar
  • 1 teaspoon oregano
  • salt and pepper to taste

Preparation:

  • Pour 1-2 tablespoons olive oil into a big pot. Heat until a drop of water dropped in will sizzle. Turn the heat down to medium. Cook the onion for 7-8 minutes until translucent.
  • Add the garlic and tomato paste and cook 2-3 minutes.
  • Slowly add the tomato sauce, stirring to incorporate. Using the empty tomato sauce can, add one can water and about 1/2 can red wine. Add sugar and seasonings, and bring to a simmer.
  • Add the meatballs and cook for about an hour.
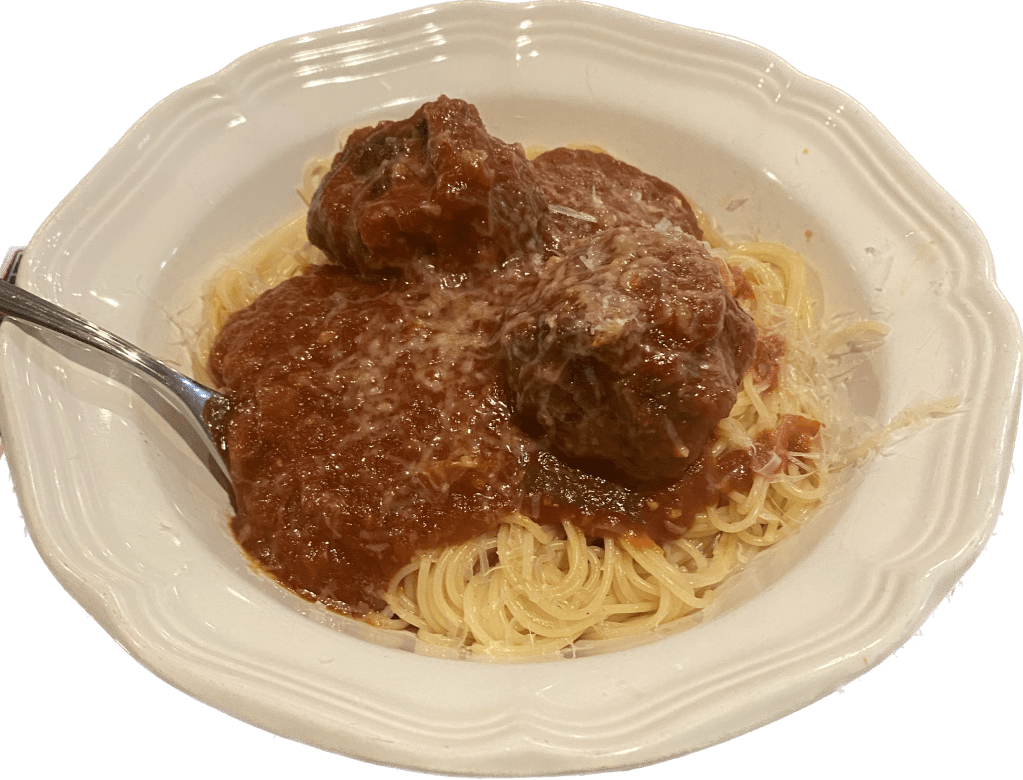
  • Serve over hot, cooked pasta. When cooking the pasta, you can add about 1/4 cup sauce to the hot, drained pasta to keep it from sticking. I also will add up to 1 cup of the pasta water to thin the sauce, if needed.

Notes:

I usually make this on the weekend. We eat it with the original sauce on a Sunday night. Then I freeze the remaining meatballs (without sauce) on a wax-paper lined tray in the fridge over night. The next day, I drop them into a gallon freezer bag and store in the freezer. Then, on a soccer night (or other busy night), I drop 12 frozen meatballs in the slow cooker with 1 jar Rao’s marina and 1/2 jar water. I cook on high for 2-3 hours (or low for 6-8) then come home and make pasta while the boys shower. Add a bagged salad and store bread, and it’s a pretty awesome weeknight dinner.

The meatball recipe comes from my friend and coworker Dana Tucker Jefferson, who also put it in the Neville Tiger Cookbook we made as a quiz bowl fundraiser a few years back. The technique of using an ice cream/ cookie scooper for the meatballs came from one of my students in a recent food presentation. The red gravy comes from trial and error, and my memories of my friend Christina’s grandmother, who made meatballs and red gravy for her many children and grandchildren every Sunday for lunch. #goals.

Featured

Apple Cranberry Streusel Pie

My husband is a “cake person,” but I am a “pie person.” The boys claim to be cake people, too, so for most of the year when we celebrate birthdays, report cards, and soccer victories, it tends to be with cake.

But Thanksgiving is when all my pie loving goes on display. I start experimenting weeks in advance, and this year, this pie is the clear winner. This is a mash-up of three of my favorites from Smitten Kitchen and Barefoot Contessa. Sweet apples, tart cranberries, and the most amazing pecan-oat-cinnamon crumble on top…

Ingredients

For the pie:

  • 1 unbaked pie crust (I sometimes make my own, but usually rely on the Pillsbury roll-out kind in the red box)
  • 1 1/2 cups (6 ounces, or 170 grams, or 1/2 standard bag) fresh or frozen cranberries
  • 1 Tablespoon (14 grams) cornstarch
  • zest from 1 lemon
  • 3/4 cup (150 grams) granulated sugar, divided (if you are using tart apples, like Granny Smith, or you like a sweeter pie, you may need 1/4 cup more sugar)
  • 4-5 small to medium apples, peeled, cored, and sliced (I used Gala, but any firm baking apple would do)
  • juice from 1 lemon
  • 1 teaspoon ground cinnamon
  • 1/2 teaspoon ground ginger

For the streusel topping:

  • 2/3 cups rolled oats
  • 1/2 cup all purpose flour
  • 1/3 cup white sugar
  • 1/3 cup brown sugar
  • 1/2 teaspoon cinnamon
  • 1/4 teaspoon salt
  • 3/4 cups pecans, toasted
  • 6 Tablespoons butter, melted and cooled

Procedure

  • Preheat the oven to 350.
  • Roll out the crust and put it in a 9 inch pie plate. Crimp the edges with a fork or by pinching with your fingers.
  • In a saucepan, combine the cranberries, cornstarch, lemon zest, and 1/2 cup sugar. The mixture will be dry at first. Cook over medium heat, stirring occasionally, for 5 – 10 minutes, until berries start to burst and juice bubbles. Remove from heat and let cool slightly.
  • Meanwhile, peel and slice the apples. Toss them with lemon juice, 1/4 cup sugar, cinnamon, ginger, and sugar. Set aside.
  • Make the streusel topping: Place all ingredients in a food processor and pulse until combined. (You may also do this with a mixer, but the oat pieces will be larger… We liked ours more crumbly.)
  • Place the apple mixture in the unbaked pie shell. Spread the cranberry mixture on top of the apples. Finally, top with the pecan streusel, spreading everything evenly.
  • Place the pie plate on a foil lined baking sheet (optional, but if your pie bubbles over, as mine did, this will make the clean-up MUCH easier).
  • Bake at 350 for 45 minutes, until the streusel is browned and the juices are bubbling.
  • I served this with vanilla ice cream, but whipped cream would also work.
  • The pie will keep in the refrigerator and makes the best breakfast!

Featured

Pumpkin Cheesecake

*Recipe updated with better pictures and streamlined instructions*

(Also, the primary helper has switched from the oldest to the youngest!)

The first time I made this cheesecake it was for an LSU game… and it was also the day I bought my first LSU shirt. 

I’ve always liked the Tigers — it’s part of living here — but I never attended LSU, and neither did any of my 4 siblings, or my husband, so I never really got around to buying a shirt.  But when we were invited to watch “the game of the century” with some friends (and once, I inadvertently dressed my son in the opposing team’s colors), I decided to go shopping for both of us. That way, no one would make him stand on the porch if LSU happened to get behind.

The Tigers beat Alabama, and the dessert was pretty good, too.

The best part of this cheesecake might be the crust.  When reading over cheesecake recipes (all of which seemed to use a graham cracker crust), I thought, why not ginger snaps?  Same cookie crunch, but lots more fall flavors.

Here’s the recipe (adapted significantly from Smitten Kitchen)
Note: this recipe is not difficult, but it gets lots of bowls dirty… so clear out your dishwasher before you get started.

For the crust:

  • 3/4 cup gingersnap crumbs (20 cookies – Anna’s Ginger Thins are the absolute BEST for this)
  • 1/2 cup pecans
  • 1/4 cup brown sugar
  • 1/4 cup white sugar
  • 1/4 cup (1/2 stick) melted and cooled butter

For the filling:

  • 3 (8 oz) packages cream cheese, at room temperature (this is very important!)
  • 1/2 cup packed light brown sugar
  • 1/2 cup white sugar
  • 2 tablespoons heavy cream
  • 1 teaspoon vanilla
  • 1 tablespoon bourbon (optional)
  • 1 tablespoon cornstarch
  • 1 1/2 teaspoons cinnamon
  • 1/2 teaspoon nutmeg
  • 1/2 teaspoon ground ginger
  • 1/2 teaspoon salt
  • 1 (14 oz) can pumpkin (1 1/2 cups)
  • 3 eggs at room temperature

For the topping:

  • 1 cup heavy cream, whipped until stiff peaks form
  • 3 Tablespoons powdered sugar OR 3 tablespoons real maple syrup (did this the last time and it was an amazing change)
  • 1 1/2 tsp cinnamon
  • 1/2 tsp ginger

Procedure:

  • Make the crust: Combine first four ingredients in the bowl of a food processor.  Add melted butter.  Press into a greased springform pan.
  • Make the filling: Put the cream cheese and sugars in the bowl of a mixer.  Beat on high for 3 – 5 minutes until very smooth.  Add the other ingredients in the order listed, beating well after each addition.  Add the eggs one at a time, beating well after each. Do not overbeat after adding the eggs.
  • Pour this into the springform pan on top of the crust.  Bake at 350 for 50 minutes, then turn off the oven BUT DON’T OPEN it. 
  • Allow the cheesecake to cool in the oven for at least an hour (I always let mine stay there overnight).  Remove and refrigerate for at least 2 hours.  Bring to room temperature before serving (and topping). 
  • Make the topping: beat the heavy cream on high until stiff. Add the sugar and spices into the whipped cream, scraping down the bowl frequently. 
  • Either serve alongside the cheesecake in a bowl or pipe on top of the cheesecake (if you are worried about unsightly cracks).

This would be perfect for a different Thanksgiving dessert.  Enjoy!

Also note that the bottom of the springform pan can be placed directly onto a cake pedestal to serve, as shown below!

*I still have trouble with this cake splitting.  I have tried putting a pan of water underneath it in the oven, and decreasing the temperature by 5 – 10 degrees, with occasional success.  Thank goodness for the topping, which hides the cracks!

*A note about ingredients: lots of people ask me about what brands I buy for this cheesecake.  The only ones that seem to make a difference are the gingersnaps (I love Anna’s Ginger Thins) and the cream cheese.  I buy Philadelphia for this.  I think the generic brand has too much water, so it doesn’t have as smooth of a texture. I usually use Libby’s pumpkin; just make sure you buy the plain pumpkin puree, not the pumpkin pie filling.  I also do not toast the pecans first (as I do in most desserts) because they get plenty brown while the cake cooks.  Also, if you do substitute maple syrup for powdered sugar in the topping, make sure to use the real stuff, not maple-flavored corn syrup 🙂  Happy Turkey Day!

Shaved Brussels Sprouts Salad

I’m hosting Thanksgiving this year, and I find my emotions swinging wildly between ecstatic (my sister is coming! With nieces!! Michael’s family will be here! With oyster dressing! And rolls!!) and sad (it’s my first Thanksgiving without my mom). But mom feels like she is constantly with me over the past few days. I can definitely thank her for the table decorations (not my forte, but looking pretty good) and hundreds of happy memories of bringing family together through food.

I’m hosting a big group (22 or 25, depending on the day). And the perennial question for all my wonderful guests: what can I bring? My answer — based on the excellent guidance of a good friend — whatever you will miss if it’s not here! For my brother-in-law, that’s pork loin and oyster stuffing. For my father-in-law: the cranberry sauce in the can. For my mother-in-law: homemade rolls (well, to be perfectly honest, her grandchildren would probably revolt because for so many years, that was all they ate at Thanksgiving… and when you’ve achieved perfection in a baked good, you better be prepared to bring it forever!).

Two years back, COVID meant we spent Thanksgiving at my friend’s instead of home for the first time since college for me. And when I asked a question I had never contemplated: what can I bring? She answered perfectly: whatever your family can’t “Thanksgiving” without. In other words, whatever reminds you the most of home and family and celebration.

So I thought about it. For me, that numbers exactly three dishes, only one of which I grew up with (Spinach Madeline). The other two I’ve found my way to over the years. First, there is the perfect Thanksgiving dessert: pumpkin cheesecake (with a gingersnap crust… that you can make 2 days in advance… seriously, it is THE BEST). And then finally, there is this salad.

I know — salad on Thanksgiving? I mean, who even cares.

And normally I’d agree. Except this one is so perfectly fall. So bright and crisp and fresh, but packing enough of a punch to hold its own among the Thanksgiving heavyweights.

Adapted from Smitten Kitchen (of course… and her Thanksgiving list of recipes… well, it only makes me wish I could do this holiday twice!)

*I am doubling this for my crowd, but this will happily serve 8-10 Thanksgiving portions… and should there be any left, it is my go-to for a post-Thanksgiving lunch.

Ingredients:

  • 1/2 cup red onion, diced small
  • 2 tablespoons apple cider vinegar
  • 3 cups shredded brussels sprouts
  • 1/2 cup fresh pomegranate seeds
  • 1/2 Honeycrisp apple, diced
  • 3/4 cups pecans, toasted and coarsely chopped
  • Juice of 1 lemon
  • 2 tablespoons honey
  • 1/3 cup olive oil
  • 1/2 teaspoon red pepper flakes
  • salt and pepper to taste

Procedure:

  • Chop the onion and put it in a small dish. Cover it with the apple cider vinegar and place to the side.
  • Shave the Brussels sprouts. You can use a mandolin or (my preference) a food processor. Place the sprouts in a large salad bowl.
  • Toast the pecans. I do this in a nonstick skillet until they smell fragrant. Allow to cool, then chop and add to the bowl.
  • Chop the apple and toss with a bit of lemon juice to prevent browning. Add the apple and pomegranate seeds to the bowl.
  • Make the dressing. In a mason jar, combine the honey, olive oil, lemon, salt, red pepper flakes, and pickled onions (with the liquid). Set aside until a few hours before you plan to serve. Shake vigorously to combine before dressing the salad.
  • 2-5 hours before serving, toss the salad with the dressing. About 2 hours before, you can safely remove this from the fridge.
  • Enjoy! And Happy Thanksgiving!

Watermelon Salad

I love the Monroe Farmer’s Market.

I realize that it’s ridiculously small by big city standards — usually just three stalls. But they stock the most delicious… well, everything. I buy perfect small red potatoes for potato salad and the best cantaloupes and watermelons. My favorite Cherokee Purple tomatoes. Peaches, fresh corn, blueberries, yellow squash… the list goes on.

I’ve been going since my oldest (now a teenager) was a baby. And this morning, for some unknown reason, when I said “do you want to go to the farmer’s market with me?” he said, for the first time in about five years, “Sure!”

Of course all of the farmers exclaimed over his height, and the old ladies told him how handsome he is, and he talked me into a 41 pound watermelon. Yes, we weighed it. It overfilled the passenger seat of my giant Ford Explorer.

Now, the watermelon from this morning is one of the sweetest I’ve ever had. But this watermelon salad recipe — it’s a bit of a miracle worker. It can even revive those ordinary grocery-store melons I sometimes resort to. But with a Farmer’s Market melon? Summer heaven in a bowl.

The recipe is adapted from Sara Foster’s Southern Kitchen, a cookbook recommended to me by one of my best friends who grew up in Georgia — and it is everything I love about modern southern cooking. Fresh, seasonal, but also nothing my grandmother and great-grandmother wouldn’t recognize.

Ingredients:

  • 2 cups cherry or grape tomatoes, halved
  • 4 cups watermelon, cubed and seeded
  • 1/2 cup fresh mint, roughly chopped
  • 1/2 cup fresh basil, roughly chopped
  • 2 tablespoons extra-virgin olive oil
  • 1 tablespoon balsamic vinegar
  • juice of 1 lime
  • salt and black pepper
  • 1/2 cup feta cheese

Procedure:

  • Combine tomatoes, watermelon, mint, basil, oil, vinegar, lime juice, salt and pepper. Toss gently to combine.
  • Cover and refrigerate for several hours or overnight.
  • Before serving, sprinkle with feta, and serve.
  • Enjoy! Perfect for the 4th of July!

*Notes:

  • I like to make the color of the tomatoes and the watermelon contrast a bit, so I use yellow or multi-colored cherry or grape tomatoes when I can find them. I’ve also done this with red cherry tomatoes and a sweet yellow watermelon.
  • The original recipe calls for sherry vinegar, but upon a friend’s suggestion, I swapped balsamic and have never gone back.
  • The original recipe also calls for heirloom tomatoes, which you can certainly use. I found, though, that when ripe, these disintegrated, whereas the cherry or grape varieties retained their shape.

Cucumber and Tomato Salad

For various reasons, my boys are out of the house a lot during lunch time this summer. When they are at work or camps, I find myself doing solo lunch instead of feeding the crowd. I keep a big bowl of this in the fridge and scoop it out for one of my favorite summer lunches, or as a healthy side when all we can muster for supper is a hot dog.

Like all simple salads, the key to this one is really good ingredients. The skinny, long cucumbers or short, extra crispy Kirby cucumbers are best here, and any kind of tomato you like. I made it with cherry tomatoes this week, but also love it with my farmer’s market favorite, Cherokee purples.

This one is adapted from my mom! It was one of her favorites, too. She sometimes added thinly sliced red onion, which was delicious, but my husband is not a big fan of raw onions, so I usually omit it.

Ingredients:

  • 2 tablespoons extra virgin olive oil
  • 1 tablespoon balsamic vinegar
  • (optional) 1/4 red onion, sliced very thin
  • 2 cups (approximately) small, firm cucumbers, chopped
  • 2 cups (approximately) cherry tomatoes, sliced in half (or any tomato will do)
  • 1/4 cup crumbled feta
  • salt and pepper to taste

Procedure:

  • In a large bowl or salad bowl, whisk together the olive oil and balsamic vinegar until emulsified. Add a little salt and pepper.
  • Add the red onions, if using, and allow to sit in the vinegar for 2-3 minutes to remove some of the bite.
  • Add the chopped cucumbers and tomatoes, tossing well to coat.
  • Add the feta and more black pepper.
  • Taste for salt, adding more as needed.
  • This salad keeps very well in the fridge for 2-3 days
  • Enjoy!
What counts as a balanced meal during the summer

Favorite Blueberry Muffins

If you’re not the parent of a teenager, a school counselor, or a teenager yourself, you may not have known that the June ACT was today. But in my world, it’s all I’ve talked about, thought about, and done since school let out at the end of May. And so while all my teacher friends were posting pics from the beach (or just in their PJs), I was waking up at 5:30 to drive around the northern part of Louisiana to teach ACT.

Don’t get me wrong — I still love every minute of it — both the helping kids part and the extra income part.

But y’all — I was exhausted!

So today… was my first day of summer!

I went to the farmer’s market and bought beautiful tomatoes (and blueberries!) I lay on the couch and watched Netflix and TikTok. I brushed my cat. I did some laundry and there are boat plans for this afternoon.

But I also baked for the first time in what feels like months. Just ask my kids.

Obviously, blueberry muffins are a family favorite and I apparently already posted a previous version on this site. But these blueberry muffins put those sad, flat-topped things to shame. I’m sure we enjoyed them in the moment… but no wonder I didn’t like the pictures!

In addition to tasting better, these were much easier (1 bowl! No mixer!) I made them with a pint of blueberries from the farmer’s market in about 15 minutes this morning — which is less time than it took my oven to preheat. And they are simply the best. We will never go back. Adapted slightly from Smitten Kitchen’s “Perfect Blueberry Muffins.”

Ingredients:

  • 5 tablespoons butter, melted
  • 1/2 cup sugar
  • Grated zest from 1/2 lemon
  • 3/4 cup sour cream
  • 1 egg
  • 1 1/2 teaspoons baking powder
  • 1/2 teaspoon baking soda
  • 1/4 teaspoon salt
  • 1 1/2 cups flour
  • 1 1/2 cup fresh blueberries (or frozen — do not defrost first)
  • 3 Tablespoons raw sugar

Procedure:

  • Preheat the oven to 375.
  • Spray muffin tin with nonstick spray (you can use muffin cups, but so much of the muffin stays on the cup, so we don’t go that route)
  • Place the butter in a heat-proof bowl (I use an 8 cup measuring cup) and microwave until melted
  • Whisk in the sugar and lemon zest
  • Add the sour cream and egg, whisking until well-combined
  • Sprinkle baking powder, baking soda, and salt on the top of the mixture
  • Switch to a spatula and fold in the flour. The mixture will be very stiff
  • Fold in the blueberries, trying not to break them
  • Scoop into 9 muffin tins (if you go for 12, they won’t be as beautifully domed)
  • Sprinkle with raw sugar
  • Bake for 25 minutes, or until a tester comes out clean

Spinach Madeline

I don’t love everything about living in the South. August, for instance, is truly terrible. And every time I go over when to use “good” and when to use “well” in my ACT prep class, at least one student says “That just doesn’t sound right!”

My standard answer: “You live in northeast Louisiana. You probably shouldn’t rely on your ear for grammar.”

But when it comes to food? Well, we may not be able to make it all sound right, but we can make it taste just fine.

Case in point? Spinach Madeline.

All my favorite food bloggers and cookbook writers say that you need a cheesy, creamy side on Thanksgiving. And a green vegetable. Spinach Madeline fills both requirements, and I can’t imagine Thanksgiving without it.

Invented by a housewife who also ran a bed and breakfast in Baton Rouge, it spread in popularity across the South. I found recipes for it all over the internet. It’s just that good.

But a decade or so ago, Kraft did something unforgivable. It discontinued the “Garlic Cheese Roll” that was a central ingredient in Spinach Madeline (not to mention another family favorite, my grandmother’s “pea goo.”) My mother and her friends wrote letters to Kraft, begging that it be returned to shelves. They were not successful.

So, what to do? Over years of trial and error, I’ve come up with two options.

Option 1: Replace the full 8 oz. of cheese with another processed cheese. The most popular one seems to be Velveeta, but I don’t like the almost plasticky aftertaste I can usually detect. My grocery store stocks some other brands in the specialty cheese bin. My favorite, when they have it, is Dutch Garden. Basically, anything that melts easily will work.

Option 2: Use a blend of Monterey Jack (or pepper jack) and cream cheese to get the proper consistency.

Ingredients:

  • 30 ounces frozen, chopped spinach
  • 6 Tablespoons butter
  • 1/2 cup chopped onion
  • 3 Tablespoons flour
  • 3/4 cup vegetable liquor, from the spinach
  • 3/4 cup evaporated milk
  • 1/2 teaspoon black pepper
  • 1/2 teaspoon celery salt
  • 1/2 – 3/4 teaspoon cayenne*
  • 1 teaspoon garlic powder*
  • 5 ounces pepper jack cheese**
  • 3 ounces cream cheese**
  • 1 teaspoon Worcestershire sauce (leave this out if you want it to be vegetarian)

*Note that if you are using either a garlic or a spicy cheese, you may want to adjust either the garlic or the spice in the recipe.

** You may also use 8 oz. of Velveta Mexican Blend; 8 oz. of pepper jack cheese; or 8 oz. of any garlic or spicy processed cheese — just make sure it melts smoothly and doesn’t get stringy!

Procedure:

  • Cook the spinach according to the packet directions. Mine just steamed in the plastic bag.
  • Place a strainer over a bowl or measuring cup. Squeeze the spinach, using the cup to catch the vegetable liquor. You will need 3/4 cup.
  • Melt the butter in a large saucepan.
  • Add the chopped onion and sauté until soft, but not brown (about 8-10 minutes)
  • Add the flour and stir until smooth. Cook 2-3 minutes.
  • Add the vegetable liquor, pouring in a little at a time and stirring well to avoid lumps.
  • Add the milk slowly, stirring until combined.
  • Add the seasonings, Worcestershire, and cheeses. Stir until completely melted and smooth.
  • Add the spinach and stir until combined.
  • Heat until bubbly.

Notes:

  • We serve this at Thanksgiving with the turkey, but it is also delicious with steaks or any grilled meat.
  • This is amazing directly from the stove, but for Thanksgiving, we pour it into a casserole dish. Place in a 350 degree oven to warm with other Thanksgiving sides. It usually takes about 30 minutes when it is refrigerated.
  • This can be made in advance and frozen.
  • I always double this. It will still fit in a standard casserole dish — it will just be deeper and take a little longer in the oven to reheat.
  • My FAVORITE thing to do with leftovers is to make an omelet and spoon warmed Spinach Madeline down the center before folding it over.
  • Happy Turkey Day!

Cornbread Dressing

Thanksgiving was one of my mom’s favorite holidays. No present-buying stress… just good food and all of her family around us. She hosted every year — her family, my dad’s family, neighbors, friends — everyone was always welcome and we usually had over 20 people there. My Uncle Bill always smoked the turkey and brought it with him, leaving her free to focus on the sides and desserts.

Two years before her stroke, she hosted a big one. She was so excited her big sister was coming down from South Carolina with her daughter and grandkids.

Her cornbread dressing was always one of my favorite things — not overpowering (and definitely not stuffed inside the turkey!). Nothing funky — no secret ingredients — just a great, basic cornbread dressing.

And then, two years ago, my sister called me for the recipe and we couldn’t find it anywhere.

Luckily, mom had always talked about getting the recipe from the wife of dad’s first boss… and the small-town stars aligned. I taught the grandchildren of that boss. So a few texts later, I had the original, in beautiful, spidery cursive. It started with boiling a hen, which mom NEVER did… but it got my sisters and I close enough that between the four of us, we recreated my mom’s cornbread dressing.

And this year, my aunt is coming in again from South Carolina. It’s been 14 years! The kids have grown a ton, and I honestly can’t wait to host everyone.

I hope your Thanksgiving is full of family, fun, and good food.

Dressing ready to be frozen until Thanksgiving Day

Ingredients

  • 2 recipes Basic Cornbread (or 2 9-inch pans of cooked cornbread)
  • 4 pieces of white bread, well-toasted
  • 4 tablespoons butter
  • 1/2 cup green onions, chopped fine
  • 1/2 cup onion, chopped fine
  • 1/2 cup celery, chopped fine
  • 1/2 cup green bell pepper, chopped fine
  • 2 teaspoons poultry seasoning
  • 1/2 teaspoon cayenne pepper
  • salt and pepper to taste
  • 5 eggs, beaten
  • 4 cups chicken broth (you could use vegetable broth and easily make this a vegetarian side)
  • 1 – 2 cups cooked chicken or turkey meat (optional — mom usually left this out, but I like it. I usually use rotisserie chicken meat)

Procedure

  • Make the cornbread. Allow to cool, then crumble into your largest mixing bowl.
  • Toast the bread and then crumble/ shred it into the same bowl.
  • Meanwhile, melt the butter and sauté the vegetables. Season with salt and pepper. Allow to cool, then add them to the mixing bowl.
  • Add poultry seasoning and cayenne. Taste for seasonings, especially for salt. The amount you need varies widely, depending on how salty your cornbread and chicken broth are. Add salt and pepper to taste before you add the raw eggs.
  • Make sure the bread and vegetable mixture is room temperature — not hot! — then add the eggs and broth.
  • Add chicken or turkey meat, if you are using it.
  • Stir well to combine. The mixture should be “soupy” and very loose, not stiff. If you need to, add more broth.
  • Pour into a greased 9×13 casserole.
  • Bake at 325-350 until lightly browned and cooked through — about 45 minutes.
  • Can be made in advance, frozen, and re-heated — just make sure to wrap it well to avoid freezer burn!
  • If you want to taste it before you serve it, spoon some into a small ramekin (pictured above) and bake it separately.

*We ALWAYS double this… It freezes well

Pictures from the last big Thanksgiving with the Carolina cousins!

Shortbread Hearts

You know who I don’t envy on Valentine’s Day? Elementary school teachers. All those sugared-up kids. Meddling class moms. Sliding cupcakes sent from home. Artistically-challenged nine-year-olds who can’t cut a paper heart to save their lives (why yes, that was me!). Kids who insist on writing in the “To” part of the Valentine, despite specific instructions to the contrary.

And so we save our most special Valentine’s treat for them — the giant, jam-filled (or nutella-filled), shortbread heart.

These take a little time compared to some of our other favorite cookies, but oh my goodness are they delicious.

Share with those you love this Valentine’s Day or any other day!

(Based on Ina Garten’s Linzer Tarts… but without almonds, apparently, they aren’t really Linzer Tarts… here’s to learning new things in 2021!)

Ingredients:

  • 3/4 pound (3 sticks) butter, at room temperature
  • 1 cup sugar
  • 1 tsp pure vanilla extract
  • 3 1/2 cups all-purpose flour
  • 1/4 tsp salt (more if using unsalted butter)
  • Raspberry, cherry, or strawberry preserves for filling… or Nutella, if that’s more your style (see my youngest child for these and more life hacks)

Method:

  • In the bowl of an electric mixer fitted with a paddle attachmet, combine the room temperature butter and sugar, mixing until well-combined. Add the salt and vanilla, mixing well. Add the flour and beat until just combined. Then choose from the roll out methods below:
  • My favorite way*: Scoop about one cup of the the room temperature dough and place it between two sheets of parchment paper. Flatten it slightly with your hand, and then roll it out using a rolling pin. I have to use my hip to keep the paper from sliding on the counter, but an extra set of hands might also help here. Once rolled to approximately 1/2 inch, place the parchment in the freezer. It will be ready to cut out cookies in about 10 minutes, but will also last for days if you want to split this up. When you remove it from the freezer, peel up the top layer of parchment and then loosely put it back down. Flip the dough over and peel up the parchment on that side. Place to the side for rolling out the next batch.
  • The more traditional way: Divide the dough into 3 sections. Slightly flatten each and wrap in plastic wrap. Refrigerate for at least 45 minutes and up to 2 days. Roll out on a well-floured countertop, adding more flour to prevent sticking.
  • Preheat the oven to 350 and line two baking sheets with parchment paper.
  • After either of the roll-out methods, use a heart-shaped or other cookie cutter to cut the dough into desired shapes.
  • To make a sandwich cookie, cut out a middle shape using a smaller heart (you can also do this with round cookie cutters).
  • Bake larger hearts at 350 for 18-20 minutes; smaller ones are ready in 8-12. Watch until they are slightly brown around the edges. Because of the different baking times, we bake the small hearts and the larger ones on separate sheets.
  • Let the cookies cool completely. If making heart sandwich cookies, dust the tops with powdered sugar. Spread the bottoms with jam, Nutella, or (if you’re like me) both. Sandwich the two together and share with your loves this Valentine’s Day!
the smaller hearts are tasty, too!

Notes:

  • Why is this my favorite way? So many reasons. First, there is less mess. No floury countertops. Also, I can have cookies sooner. Also, the cookies are not as tough because they don’t pick up any extra flour. Also, did I mention less mess?
  • Yes, I’ve posted this recipe before, back in the blogspot days… apparently right before a big ice storm in February? I love looking back at the icy pictures of these sweet boys.
  • You can absolutely just make these as plain shortbread cookies, any old day of the year, and they will be amazing. I’ve also been dreaming of melting chocolate and dipping half of each cookie in that…

Sweet and Spicy Pecans

One of our pandemic adventures was to purchase a new rental property, this one on a lake a little over an hour from where we live.

When we were looking, I was focusing on deep water and open floor plans; my husband’s main goal was finding something that required minimal repairs, since it was quite aways from his favorite Home Depot.

Neither of us were looking for pecan trees, but we ended up with 11 of them, and while 2020 was not good for a lot of reasons, for pecans in Louisiana, it was apparently the best in a while.

My kids picked and sold them (most notably to a student’s grandmother, who gave them back in the form of the BEST pralines). And we threw the rest into the freezer, where they come out for special occasions, like Superbowl Sunday.

This recipe is based on one by Sara Foster in her amazing cookbook, Southern Kitchen. They are salty, sweet, spicy, and absolutely addicting.

Ingredients:

  • 4 cups (1 pound) shelled pecan halves
  • 1/2 cup raw sugar* (see note)
  • 2 tablespoons fresh rosemary, chopped coarsely
  • 1 tablespoon Kosher salt, plus more to taste
  • 1/2 teaspoon freshly ground black pepper
  • 3/4 teaspoon cayenne pepper (reduce if you want a little less kick)
  • 4 tablespoons butter, melted
  • 1 tablespoon Worcestershire sauce

Method:

  • Preheat the oven to 400. Line a large, rimmed baking sheet (I used a half sheet pan) with aluminum foil.
  • Spread the pecans onto the sheet in a single layer. Place them in the oven to lightly toast, 5 – 6 minutes. They should not be deep brown, but they should be fragrant when you remove them.
  • Meanwhile, combine the sugar, rosemary, salt, black pepper, and red pepper in a small bowl. Stir to mix.
  • In a heat-proof bowl or 8 cup measuring cup, melt the butter. Add the Worcestershire.
  • When the pecans are lightly toasted, remove them from the oven and pour them into the bowl with the melted butter. Toss to coat. Then add the sugar and spices, tossing well to coat completely.
  • Pour this mixture back onto the lined sheet pan. Bake for 8 – 10 minutes, stirring twice, until toasted.
  • Remove from the oven and let cool completely before trying to remove them from the foil.
  • Once the pecans have cooled, peel them off of the foil (I tilted the pan over a large serving bowl, shaking loose most of the pecans, and then peeled the aluminum foil from the back of the stuck ones, breaking up the crystalized sugar as I went. These were the best ones!)
  • Store in an airtight container for up to a week (although I doubt they make it through the third quarter in our house).

Notes:

  • Don’t have raw sugar? You can substitutde demerara, turbinado, or light brown sugar
  • Sara’s original recipe called for vanilla instead of Worcestershire, and while we appreciate sweet, we were more into the savory.

Enjoy!